Showing posts with label jewelry. Show all posts

'Button' Rings

1 comments
 My laptop is still in a coma but I really wanted to get a post out before my uni week began again. I went to Lincraft on the weekend and spotted these interesting buttons so I made them into rings. 

 You will need:
Buttons; I found this cool crescent moon button and this silver stamp button which had this hieroglyphic kind of symbol
Ring bases; a gold and a silver to match the buttons
Superglue
Pliers

 Use the pliers to remove the button loops. If the loops don't come off clean, you may need to use a nail file or rough sandpaper to smooth it down.

 Simply superglue the ring bases onto the buttons and your rings are good to go!


Ombre Jewelry Display Stand

0 comments
Borrowing the idea from Weddings and Cookies' Cookie Stand DIY, I made myself a white-to-clear ombre stand for all my bracelets and bangles. (Hopefully you can somewhat see the ombre effect in the mirror!)
 I don't mind the look of the stand being complete white but I think the glass of the candlestick makes it stand out and look a bit more expensive than it is.
You could do all sorts of shapes and sizes, mix and match to store all your rings, nail polishes, lipsticks etc!

 You will need:
Plate; ones with interesting detail turn out well
Candlestick; preferably one with a flat top so it'll be easier to glue

Newspaper
Glossy White Spray Paint
Superglue

 Apply superglue to the top of the candlestick

Wait until the superglue has turned tacky before turning over and gluing to the center of the plate.

 Start spray painting!

To create the ombre effect, just avoid aiming the spray paint directly at the candlestick and loose particles of paint will gather at the top of the candlestick anyway
After that's dried, turn it over and spray paint the the other side.
If you're worried about getting paint on the bottom, wrap it up in newspaper

And you should be left with this!

 
If you're going to use this as a cake stand, you'll want to seal the spray paint with some sort of sealant but if you're using it for non-food purposes, you're done!!

Tribal & Silver

0 comments
 Necklaces | Sportsgirl

 Rings | Vintage

Bangles | Myer

Good things apparently come in pairs.

Copper DIYs

0 comments
 I drove (yesss) to Bunnings the other day and I found more wicked copper plumbing bits. The whole lot only cost me about $5 which amazing since they're so different to what's available at the usual craft stores and I have 3 DIYs using them.

 The compression olives (I'm guessing that's what they're called) were about $3 and it came in a pack of 10; 5 copper rings and 5 nylon rings.

 The 20mm pack is the perfect size for your fingers and since there are so many they're stackable!

 For the capillary elbow, I just chucked it on a black ribbon. I think it's the perfect piece on a plain white top or for layering with other necklaces.

 Since the capillary tee is such a unique piece, I thought that it would be a great foundation for a statement necklace. 

 I first slid the tee onto a gold chain and then pulled the chain through the bottom of the tee.

 I found the middle of the chain; very important otherwise your necklace will be lopsided! and then used a jump ring to loop a rose pink tassel onto the chain.

 The finished product of the tee necklace against my very dirty wall. 
Obviously you can use any coloured tassel but I think the pink and the copper go very well together. 

And there we have 3 DIYs for next to nothing!

Starry Studs

0 comments
I've officially finished my very first semester at uni! I'm absolutely over the moon and now I've got an amazing 6 weeks off so I'll be posting a lot more (hopefully)
And finally here's a new super quick, super easy DIY; galaxy-inspired starry studs!!


 You will need:
Plain black stud earrings ($4 from diva)
Glitter nail polish; blue & silver

 Paint the studs with the silver glitter polish; it's important to not use too much because it can 'overflow' and take forever to dry

 And after that's dried, repeat with the blue glitter.
When that's finished drying, clean up the edges with nail polish remover.

 Färdig!! (Just practicing my Swedish haha)

Halo Cross Necklace

0 comments
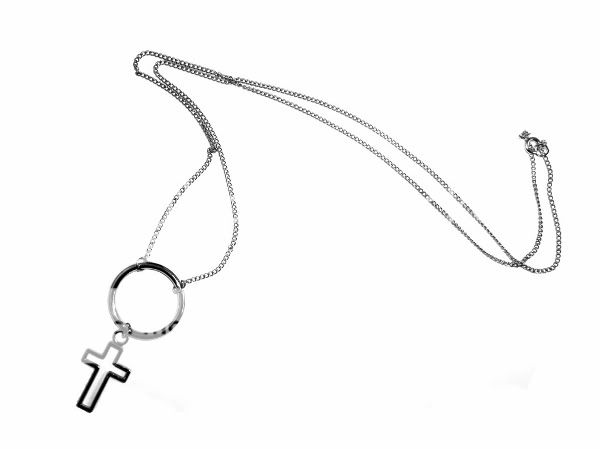
I was browsing Shop W.A.S. (their stuff is too cool for me) and I stumbled across this necklace and I thought I'd do my own take on it with what I've got.
Halo Necklace | Shop W.A.S.

You will need:
A long chain (I've got 2 tiny jump rings on the end)
A large jump ring (or key ring hoop, I find them a lot easier to use)
A cross charm (and another jump ring!)

Simply loop the chain onto the ring

.... and the cross charm too!

Too easy. (:

Gold 'n' Plate

2 comments
 Basically died and ran to the checkout when I saw the hair cuff at Dotti.

I also got myself a new ring display plate from Typo! It's a map of Europe with the UK and Sweden! swoon.

Neck Envy

1 comments
Gold Triangle Point Collar Necklace | LittleDirtyDish's Etsy

Gold & Silver Collar Bib | The Fashion Outsider

Peter Pan Skull Chain Collar Bib | FrancisFrank's Etsy

When Less Is More

0 comments
Quiet pieces which still capture your eye; these plain neck cuffs, bangles & rings do just that.


Liberty Rings | Sarah & Sebastian

pencil drawing of 02.07.1964 bangles | Etten Eller

Crystal Clear - Wah Wah

0 comments
These pieces are from Wah Wah, created by Sydney / New York based designer, Anna McKeon.
Their About section simply shows 10 words which encapsulate what the pieces are all about;
clashing / fusion
clean shapes / mixed metals
contrast / balance
beauty / strength

You can evidently see these characteristics in all of these stunning pieces:

ISIS III bracelet- $110
Crosses! What's not to love?

SUNNA bracelet
I love how the silver chain and circle face makes this look like a watch. Also the perspex allows the bracelet to be personalised by your own skin colour.

STAR pendant - $88
My favourite piece; I can only imagine how gorgeous this is in the sun.

SOL cuff - $160
This piece reminds me of Ivana's Cuffs but I love the extra detail of the gold nuts/screws.

SOLO necklace - $160
I love the tribal feel the splayed out acrylic shapes give and look at how delicate and simple the hook is.

Most of the pieces and more are available at the shop, here.

Collar Studs & Drape Chain

4 comments

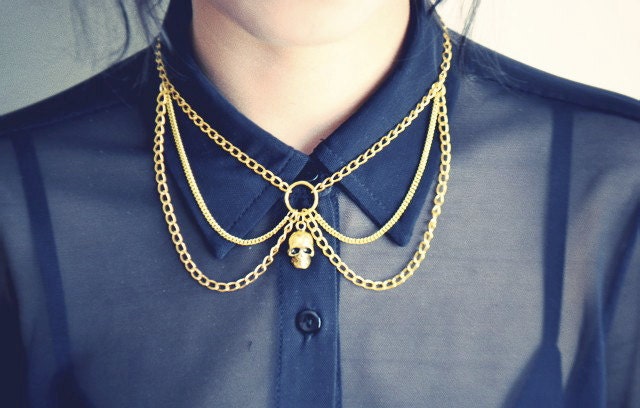
This was my inspiration which I've seen this floating around tumblr recently.
It's a bit gangsta and chic, a bit like LDR.
The skull is sewn on but I thought of a much less permanent and quicker way doing it.

You will need:
Any type of stud earrings, both from Lovisa (You could use pearl studs, diamonds, crosses, skulls!..)
Chain (I used an old bracelet which is the perfect length, approx. 18cm)
And a collared shirt
Pierce the collar with the stud earrings
Hook the chain onto the post
Secure the stud with an earring backing
And that's it!!

Here I swapped the studs for my favourite unicorn & cat studs.